I can't eject a disc You want to use a CD or a DVD, but…
Be Master of Your PS4 with Our 10 Tricks
1) HOOK UP A KEYBOARD AND MOUSE
Using a keyboard and a mouse with your PS4 is as easy as connecting them to the front of your console. Ok, you may not want to use them to get on the rampage in GTA V, but if you’re doing a few forms compilation or web browsing it’s much easier than playing with the DualShock 4. Most devices will work without a request additional configuration
You can also use the wireless Bluetooth kit if you want to relax on the couch as you type, and after a few seconds you should be in business (go to Devices in Settings to pair them). Some games support mouse and keyboard controls, but most do not get an unfair advantage over other online readers with standard controllers.
2) USE THE PLAYSTATION APP FOR MESSAGING
Sony has a couple of PlayStation apps available for Android and iOS that let you use your phone as a second handy screen for your console. One of the best features of these apps is the messaging component. You can use it to chat with other players without having to switch from PS4 gameplay or even activate the console.
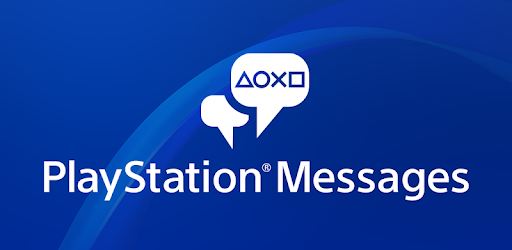
Some games support the use of the mobile app as a second screen, and you can even use it as a remote control for your PS4. With phone and console on the same network, choose Settings, PlayStation app connection settings and Add device on your PS4, then Connect to PS4 and Second Screen from within the mobile app.
3) TURN ON VOICE COMMANDS
Thanks to Siri, Google Now, Amazon Echo and others, we are all much more accustomed to barking instructions to our electronics these days, and the PS4 does not have to be excluded from the party. If you want to be able to control the console using your voice, you need a headset with a microphone, or you can use the microphone in the PlayStation camera.

Go to Settings then System and make sure that the option Operate PS4 with voice is enabled in the Voice Operation Settings menu. From the same screen you can get help with the use of the function and view a complete list of supported commands: allows you to switch from one menu to another, capture screenshots, start apps and menus, disable the PS4 and more.
4) SAVE GAMES TO USB
If you’re updating your PS4 hard drive, playing on someone else’s machine, or planning to back up your precious game results, it’s easy enough to transfer your saved game data to a connected USB drive or an external hard drive. Importing data in another way (for example, on a new machine) is equally simple.
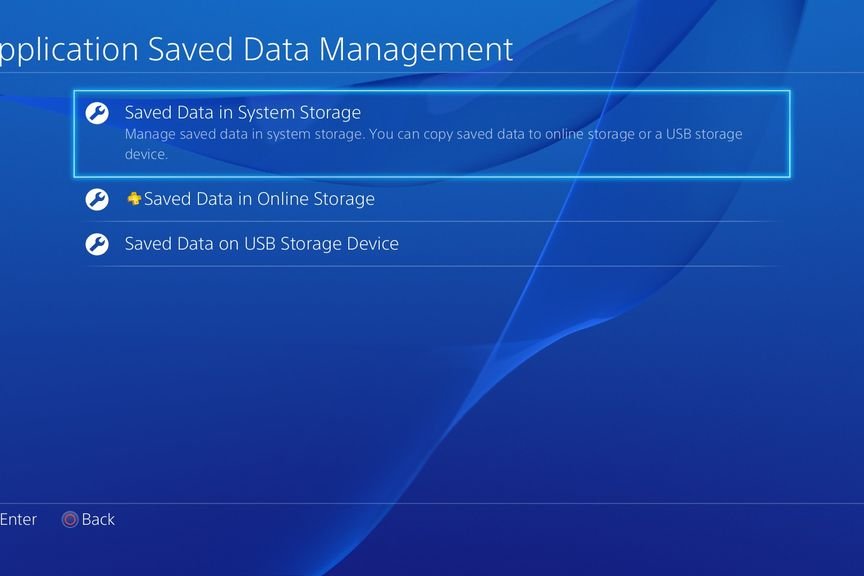
From Settings select Application Saved Data Management and get options to move data between the local PS4, the connected USB drive and the PlayStation Plus online locker. You can also transfer screenshots to a USB device by choosing Capture Gallery from the main menu. PS4, flipping through the images and pressing Options.
5) PLAY ALL OF YOUR MEDIA FILES
If you can connect a USB stick or an external drive to your PS4, you can play media files. Make sure that the drive in question is formatted FAT32 (instead of NTFS), that your files are stored in folders and that they are saved with the correct codecs. All types of MKV, AVI, MP4, JPEG, BMP, MP3 and AAC are supported, says Sony.
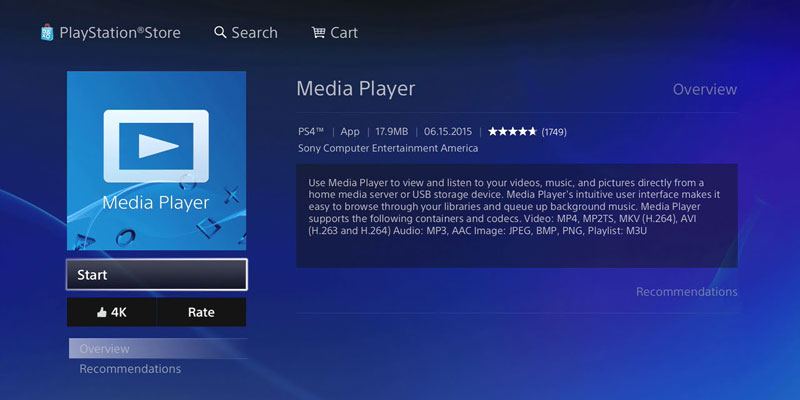
It is not the only option to get your media files on your Sony game console. The always wonderful Plex application is a way to get content from your computer to your PS4 (and it’s free), but if you want a slightly more complex route you can configure a DLNA server and use it to stream music, videos and photos to the PlayStation box
6) INSTALL AN SSD FOR FASTER LOAD TIMES
Repairing a solid-state drive inside your PlayStation 4 will not give it any computing advantage, but it can work wonders for loading time. It’s especially effective for those games that insist on huge savings (we’re watching you, Witcher 3). The process is not difficult and takes only a few minutes from start to finish.
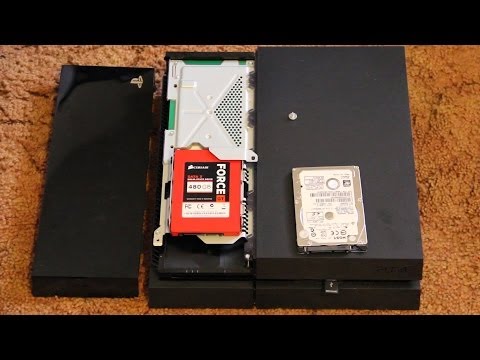
You will find many step-by-step guides on the web. Our Lifehacker friends have one of the most complete guides out there, although as we say it is not an extremely complex process. Be sure to back up all your backups, screenshots and other bits of personal data to an external hard drive before swapping the main one to the system.
7) KEEP YOUR KIDS SAFE
If you want to put a limit on what your kids can and cannot do on PS4, Sony covers you. You can set up accounts for children, block games and movies that are too old for your children, restrict access to your web browser and keep an eye on their activities. It’s like setting up separate accounts for your children on Windows.

From Settings go to Parental Control then Restrict Use of PS4 Features to get this configured the way you want. You cannot set individual permissions for individual accounts, which means it’s a bit more complicated to use if you have two very old children. You can configure sub-accounts from the same Parental Control screen.
8) PLAY GAMES ON MAC OR WINDOWS
You can finally play PlayStation 4 remotely on a Mac or Windows computer, if you have a powerful enough wifi signal. (Sony recommends loading and downloading speeds at 12 Mbps for best results.) Go to the PS4 Remote page to download the software you need for your favorite machine, then follow the instructions to install it.
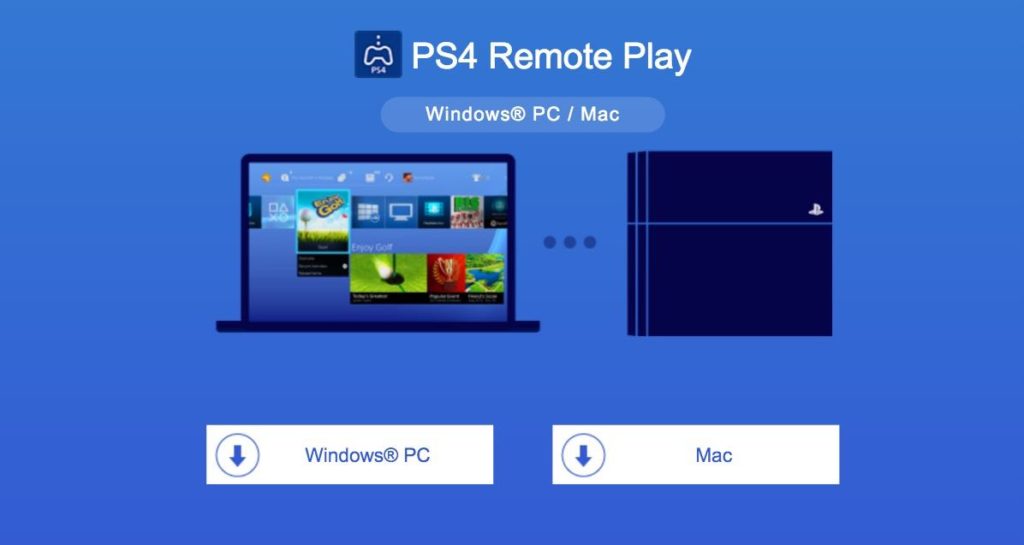
On your PS4, go to Settings, then Remote Play Connection Settings and check the Enable Remote Play box. Activate the console as the main system via the PlayStation Network / Account Management screen and enable remote play in sleep mode (if desired) using Set Features Available in Rest mode in Power Save Settings.
9) DIM YOUR DUALSHOCK 4
You cannot turn off the light on the back of the DualShock 4 controller completely (you need to locate the PlayStation camera for one thing). But you can ease it down a little, if it ruins your carefully lit game experience. Press and hold the PlayStation button on the controller and Select Adjust Audio and Devices when the menu is displayed.
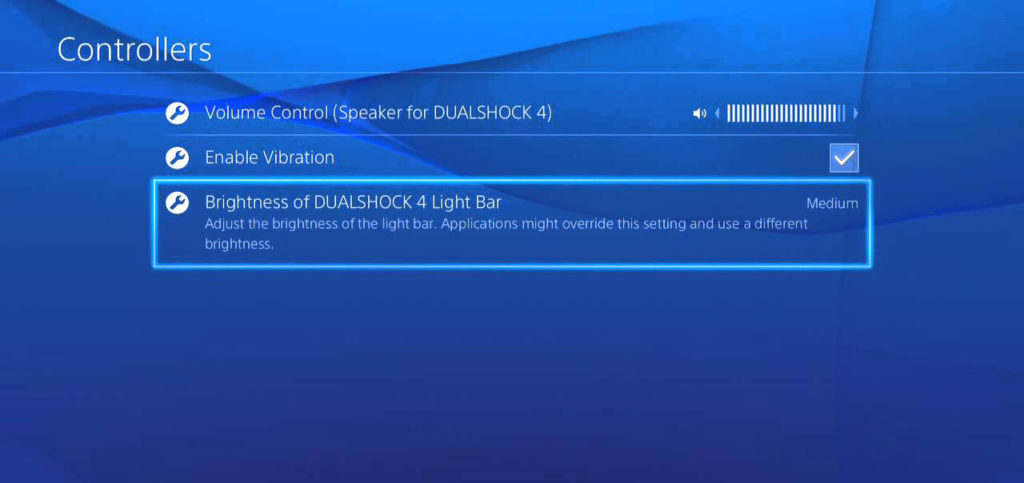
Select Brightness of DualShock 4 Light Bar from the list of on-screen options and get three additional settings to choose from: Bright (Standard), Medium and Dim. Make your choice and the DualShock 4 light instantly adjusts. Apparently, the light emitted from the controller will also be used by the upcoming Sony virtual reality headset.
10) TAKE FASTER SCREENSHOTS
By default, pressing the Share button at the top of the DualShock 4 controller displays the View menu, but you can change this behavior if necessary. Press Options in the Share menu, select Sharing and Broadcast Settings, and then select Share Button Control Type. Here you can change the way the Share button works when you tap it briefly.
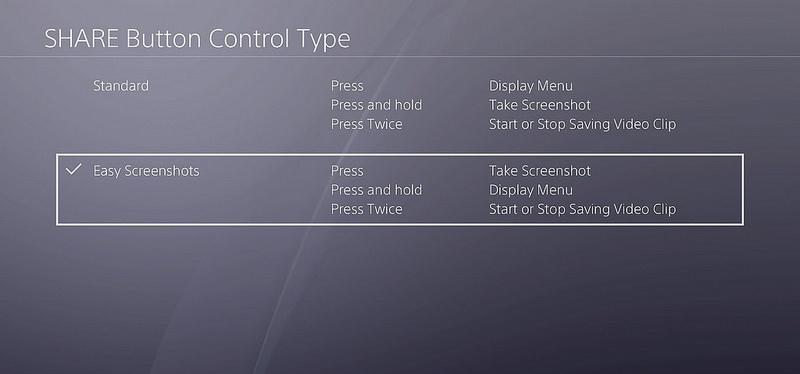
Choose the Easy Screensshots and a quick press (rather than a long press) of the Share button captures a screenshot and lets you stay focused on your games. You will then need to press and hold the button to display the View menu; as before, pressing the Share button twice allows you to start or stop recording video. You can return to the default values at any time.